When it comes to protecting your home, addressing water-related issues quickly is crucial. Left unchecked, these problems can lead to mold growth and structural damage within just 48 hours. Acting fast can save you from costly repairs and ensure your living space remains safe and comfortable.
Professional water damage mitigation services use advanced tools like thermal cameras and moisture meters to detect hidden issues. According to NSH Home Services experts, these techniques help contain the spread of damage effectively. The average cost for such services ranges from $1,300 to $5,200, making it a worthwhile investment for long-term protection.
Consider installing water detection systems in your home for added peace of mind. These devices alert you to potential leaks early, preventing extensive damage. If you’re facing a water-related emergency, don’t hesitate to call +1 (551) 220-6990 for immediate assistance.
Key Takeaways
- Address water-related issues within 48 hours to prevent mold growth.
- Professional services use tools like thermal cameras for accurate detection.
- The average cost of mitigation ranges from $1,300 to $5,200.
- Experts recommend containing damage spread quickly for effective results.
- Install water detection systems for long-term protection.
Understanding Water Damage Mitigation
Taking swift action during a home emergency can save you from long-term issues. One of the most critical steps is understanding the process of mitigation. This involves stopping the liquid flow and drying the affected area to prevent further harm.
What is Mitigation?
Mitigation focuses on stopping the spread of harm and drying the property. It’s different from remediation, which involves cleaning contaminants, and restoration, which rebuilds the affected area. Acting quickly is essential because mold can start growing within 48 hours.
Why is Mitigation Important?
Delaying the process can lead to severe structural risks. For example, clean liquid from a broken pipe is easier to handle than sewage-contaminated black liquid. The IICRC categorizes these issues into three levels, each requiring a different approach.
| IICRC Category | Description | Examples |
| Category 1 | Clean liquid | Broken water supply line |
| Category 2 | Gray liquid | Washing machine overflow |
| Category 3 | Black liquid | Sewage backup |
Understanding these categories helps in choosing the right damage mitigation strategy. Whether it’s clean or contaminated, acting fast ensures your home remains safe and secure.
Types of Water Damage
Not all liquid-related problems are the same—knowing the differences can save you time and money. Understanding the categories helps you take the right steps to protect your home and health.
Clean Liquid Issues
Clean liquid comes from safe sources like broken pipes or rainwater. It’s the easiest to handle because it doesn’t contain harmful contaminants. Basic drying techniques are usually enough to resolve these issues.
However, if left unaddressed, even clean liquid can lead to swelling or delamination of materials. Keeping humidity levels below 60% helps prevent further complications.
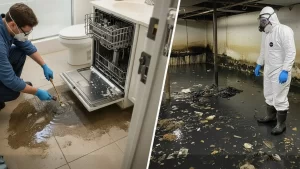
Gray Liquid Issues
Gray liquid is slightly contaminated and often comes from appliances like dishwashers or washing machines. While not as hazardous as black liquid, it still requires disinfection to ensure safety.
Ignoring gray liquid can escalate the problem, making it more severe. Always wear protective gear when handling these situations.
Black Liquid Issues
Black liquid is the most dangerous, containing sewage or floodwater. It poses serious health risks and requires professional handling with proper PPE (Personal Protective Equipment).
Signs of black liquid issues include foul odors and visible sewage. Immediate action is crucial to prevent long-term harm to your home and health.
Steps to Mitigate Water Damage
Quick and effective action can minimize the impact of liquid-related issues in your home. Following a clear process ensures your property stays safe and secure. Here are the essential steps to take when facing such emergencies.
Step 1: Stop the Water Source
The first step is to identify and stop the source of the issue. Whether it’s a broken pipe or an overflowing appliance, shutting off the main supply prevents further spread. Always turn off electricity in the affected area to avoid safety hazards.
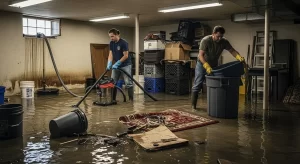
Step 2: Remove Standing Water
Next, remove any standing water using submersible pumps or wet vacuums. This step is crucial to prevent swelling or delamination of materials. Acting quickly reduces the risk of long-term harm.
Step 3: Dry and Dehumidify
After extraction, focus on drying the area thoroughly. Use commercial air movers and dehumidifiers to speed up the process. Household fans may not be as effective for larger spaces.
Step 4: Clean and Sanitize
Finally, clean and sanitize the affected area to eliminate contaminants. For severe cases, use antimicrobial solutions to ensure safety. Verify the results with a moisture meter to confirm the area is completely dry.
“Taking the right measures early can save you from costly repairs and ensure your home remains safe.”
Essential Equipment for Water Damage Mitigation
Having the right tools on hand can make all the difference in addressing home emergencies. Proper equipment ensures faster, more efficient solutions, minimizing long-term risks. Here’s a breakdown of the essential tools you’ll need.
Pumps and Extractors
When dealing with excess liquid, pumps and extractors are your first line of defense. Wet/dry vacuums are ideal for smaller areas, while truck-mounted extractors handle larger spaces more effectively. Both options are essential for removing standing liquid quickly.
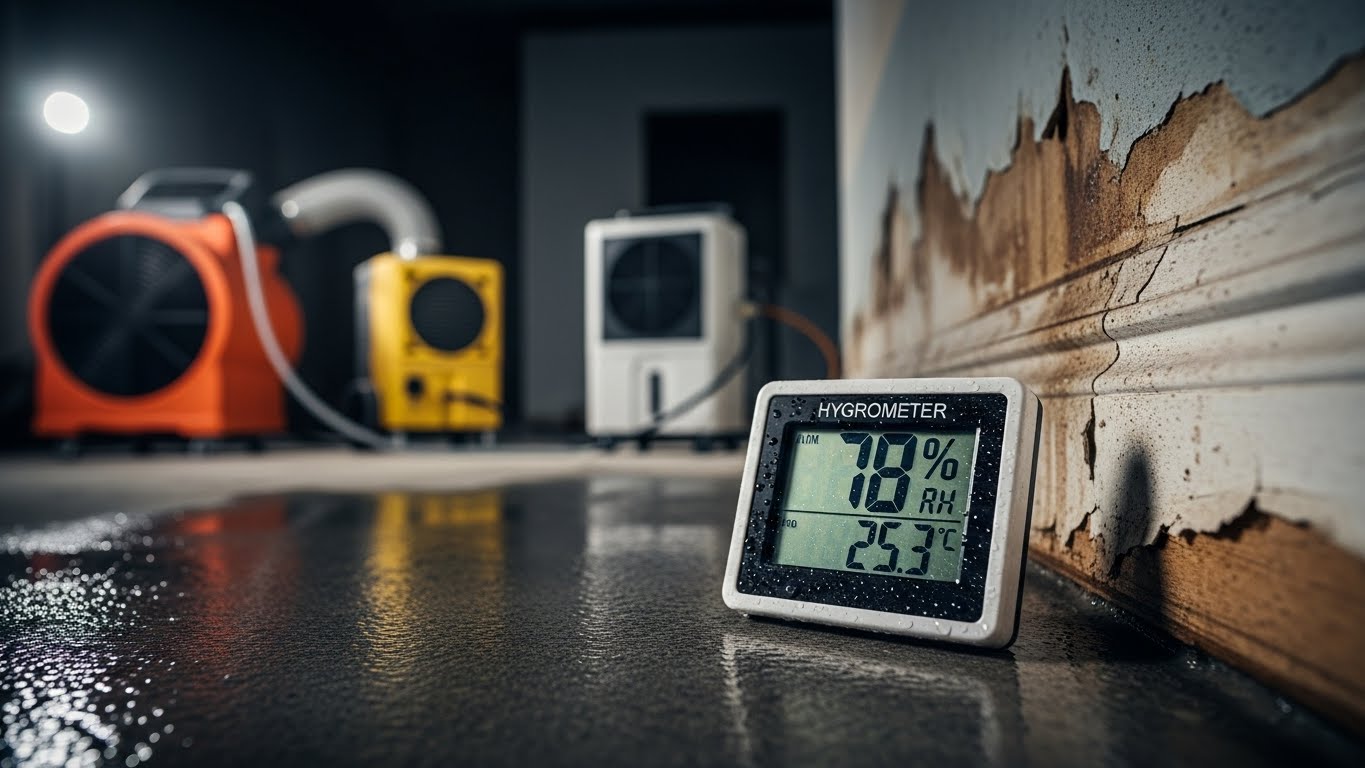
Dehumidifiers and Air Movers
Drying the area after extraction is crucial. LGR dehumidifiers are highly effective for removing moisture from the air. Pair them with commercial air movers to speed up the drying process. These tools ensure your home returns to a safe, dry state.
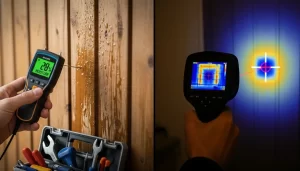
Moisture Meters and Thermal Cameras
Detecting hidden issues is just as important as addressing visible ones. Infrared cameras can identify areas of saturation behind walls or under floors. Moisture meters verify the dryness of materials, ensuring no lingering issues remain.
Tool Purpose Best Use Case
Wet/Dry Vacuum Removes standing liquid Small to medium areas
Truck-Mounted Extractor Handles large-scale issues Commercial or extensive home use
LGR Dehumidifier Removes moisture from air Post-extraction drying
Infrared Camera Detects hidden saturation Behind walls or under floors
For added convenience, consider using the SafetyCulture app for documentation and Home Depot Pro Xtra for equipment rentals. These resources make the process smoother and more efficient.
Preventing Mold After Water Damage
Mold can quickly become a serious issue if not addressed promptly. It thrives in damp environments and can start growing within 48 hours. Left unchecked, it can compromise your home and health, especially after exposure to contaminated liquids.
Why Mold is a Concern
Mold isn’t just unsightly—it poses significant risks. Exposure to black liquid, for example, can lead to toxic mold growth. This type of mold releases spores that can cause respiratory issues and other health problems. Addressing the issue early is crucial to avoid long-term consequences.
How to Prevent Mold Growth
Preventing mold involves controlling moisture and cleaning affected areas thoroughly. Here are some effective strategies:
- Use HEPA vacuums and air scrubbers to remove spores from the air.
- Apply antimicrobial fogging to porous materials like drywall and insulation.
- Dispose of items that can’t be cleaned, such as mattresses and carpet padding.
- Monitor humidity levels, keeping them between 40-60% to discourage mold and mildew growth.
Prevention Method Purpose Best Use Case
HEPA Vacuuming Removes mold spores Airborne contamination
Antimicrobial Fogging Kills mold on surfaces Porous materials
Humidity Monitors Controls moisture levels Preventative measure
By following these steps, you can protect your home from mold and mildew, ensuring a safe and healthy environment for your family.
When to Call a Professional?
Recognizing when to seek professional help can save your home from irreversible harm. While some issues can be handled independently, others require the expertise of specialized companies to ensure safety and efficiency.
Signs You Need Expert Help
Certain red flags indicate the need for professional intervention. For example, sagging ceilings or warped walls often signal structural damage that requires immediate attention. Additionally, Category 3 contamination, such as sewage or flood issues, demands hazmat protocols to ensure safety.
Another sign is when dealing with insurance claims. Professionals can assist with documentation, ensuring you receive the coverage you deserve. NSH Home Services, for instance, offers comprehensive support in such cases, making the process smoother for homeowners.
Benefits of Professional Mitigation
Hiring experts comes with several advantages. Here’s why professional services are worth considering:
- Advanced Equipment: Professionals use industrial-grade tools like air movers and dehumidifiers, which are far more effective than household alternatives.
- Faster Results: Their expertise and equipment ensure quicker drying times, reducing the risk of mold growth.
- Hidden Cost Savings: By preventing mold and structural issues, professionals save you from expensive repairs in the long run.
“Investing in professional services not only resolves the immediate issue but also protects your home from future problems.”
For severe cases, such as black flood issues, costs can average $8 per square foot. While this may seem high, the benefits of professional handling far outweigh the risks of DIY attempts. If you’re unsure, don’t hesitate to call +1 (551) 220-6990 for expert advice.
Cost of Water Damage Mitigation
Understanding the expenses involved in home emergencies can help you plan better. The cost of addressing these issues varies widely, depending on factors like the extent of the problem and the materials affected. Knowing what to expect can make the process less stressful and more manageable.
Factors Affecting Cost
Several elements influence the final price of repairs. The size of the affected area is a major factor, with larger spaces costing more to address. Contamination levels also play a role—clean issues are less expensive than those involving hazardous substances.
Another consideration is the type of materials involved. For example, replacing drywall can cost between $45 and $55 per square foot. Similarly, flooring repairs or replacements add to the overall expense. Multi-room issues are typically more costly than localized problems.
How to Get an Accurate Estimate?
To avoid surprises, it’s essential to get a detailed, itemized quote from professionals. This breakdown helps you understand where your money is going and ensures transparency. Always compare estimates from multiple providers to find the best value.
If you’re filing an insurance claim, proper documentation is crucial. Take photos of the affected area and keep records of all communications with your provider. This step ensures you receive the coverage you’re entitled to.
- Square footage and contamination level are key cost drivers.
- Drywall replacement averages $45-$55 per square foot.
- Multi-room issues are more expensive than localized damage.
- Itemized quotes provide clarity and prevent hidden fees.
- Document everything for insurance claims.
Common Mistakes to Avoid
Avoiding common errors can save your home from extensive harm. Whether you’re dealing with minor leaks or major flooding, knowing what not to do is just as important as taking the right steps. Here are some pitfalls to watch out for.
Ignoring Early Signs
One of the biggest mistakes is overlooking early warning signs. Buckled flooring or discolored walls often indicate underlying issues. Ignoring these can escalate the problem, leading to more severe damage and higher repair costs.
Mold growth can begin within 48 hours, so acting quickly is crucial. Early detection saves money and protects your home’s structural integrity.
Using Incorrect Equipment
Using the wrong tools can make matters worse. Household fans, for example, are no match for commercial air movers when it comes to drying large areas. Similarly, amateur pump use can lead to electrical hazards, especially in wet environments.
Investing in the right materials and equipment ensures effective results. Professionals rely on industrial-grade tools because they get the job done safely and efficiently.
Delaying the Mitigation Process
Procrastination is your worst enemy in these situations. Delaying the process allows problems to worsen, increasing the risk of mold and structural harm. Quick action is essential to contain the issue and prevent further complications.
Improper handling of sewage or contaminated liquids can also lead to legal liabilities. Always prioritize safety and efficiency to avoid long-term consequences.
- Buckled flooring signals advanced damage—don’t ignore it.
- Household fans are ineffective compared to commercial air movers.
- Mold can grow within 48 hours—act fast.
- Amateur pump use poses electrical risks.
- Improper sewage handling can lead to legal issues.
Long-Term Protection Against Water Damage
Long-term safety starts with consistent maintenance and smart solutions. By taking proactive steps, you can safeguard your home from potential issues and ensure peace of mind for years to come.
Regular Maintenance Tips
Keeping your home in top shape requires regular attention. Start by scheduling sump pump tests twice yearly to ensure they function properly. Replace rubber hoses with steel-braided lines for added durability and safety.
Landscape grading is another essential step. Properly sloped yards direct liquid away from your foundation, reducing the risk of flooding. Don’t forget to clean your roof gutters frequently to prevent blockages that can lead to overflow.
Installing Water Detection Systems
Modern technology offers advanced ways to protect your home. Wi-Fi-enabled moisture sensors can alert you to leaks before they become major problems. These devices are easy to install and provide real-time updates, giving you an extra layer of security.
For added protection, consider smart leak detectors near appliances and supply lines. These systems integrate with your smartphone, allowing you to monitor your home even when you’re away. Investing in such equipment can save you from costly restoration work down the line.
“Prevention is always better than cure—small steps today can prevent big problems tomorrow.”
By combining regular maintenance with smart technology, you can create a robust defense against potential issues. These measures not only protect your home but also ensure a safer, more comfortable living environment for your family.
Protecting your home from unexpected issues requires timely action and the right approach. Acting within the first 48 hours is crucial to prevent problems like mold growth and structural harm. Professional services use advanced tools to ensure effective restoration, saving you from costly repairs.
For severe issues, DIY attempts can be risky. Always rely on experts for Category 3 situations to avoid health hazards. Preventative measures, like regular maintenance and smart detection systems, can save you money and stress in the long run.
If you’re facing an emergency, don’t hesitate to call +1 (551) 220-6990 for immediate assistance. Quick action and professional help ensure your home stays safe and secure.